

AI Summarize
![]()
![]()
![]()
![]()
![]()
Share
![]()
![]()
![]()
Adding a Return and Refund Policy to your WooCommerce store is a very smart business move for a number of reasons.
An RRP will help you limit the timeframe and circumstances for when you accept returns and offer refunds. This helps you maintain as much control as possible over your business transactions.
When you display an RRP, you'll also help manage customer expectations since they can learn about your return and refund practices before deciding to make a purchase from your WooCommerce store. This helps with transparency, and will make your customers happier overall.
After you have a Return and Refund Policy ready to be displayed, follow these simple instructions to add your RRP to your WooCommerce store.
Use our Return & Refund Policy Generator to generate a Return and Refund Policy for your store. Just follow these steps:
-
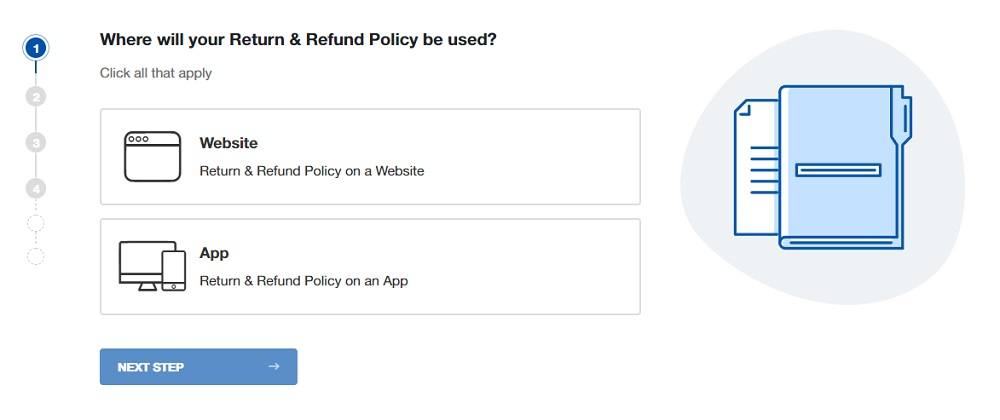
At Step 1, select where your Return & Refund Policy will be used.
-
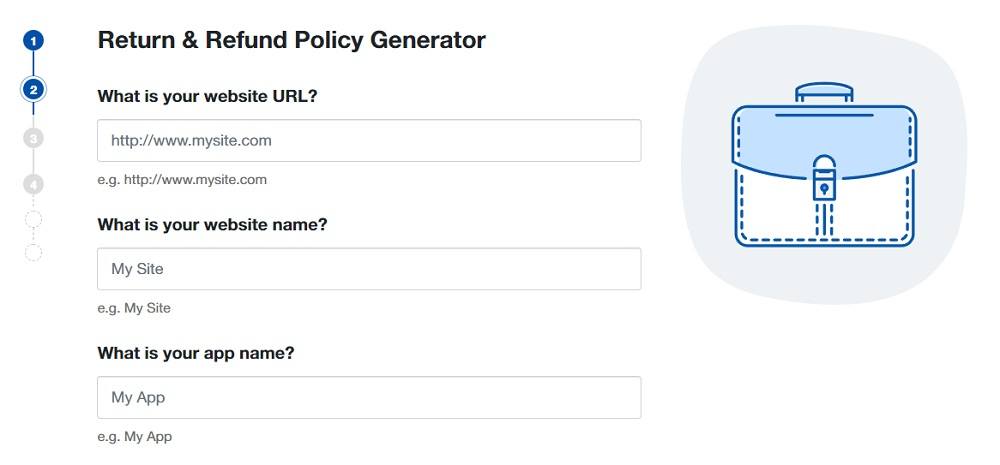
At Step 2, add information about your website/app and business.
-
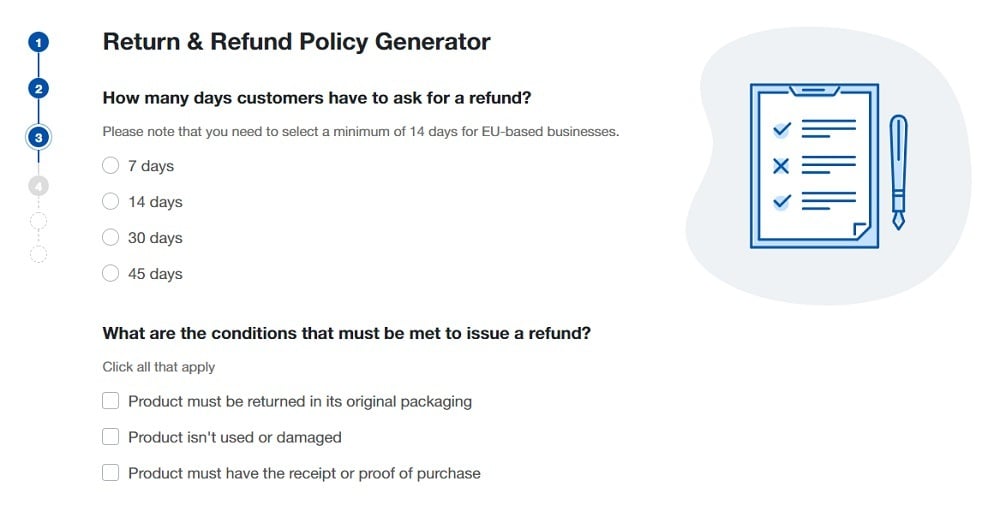
Answer some questions about your business practices.
-
Enter an email address where you'd like to receive your Return and Refund Policy and click "Generate."

Done! You'll be able to instantly access and download your new Return and Refund Policy.


How to Link to a Return and Refund Policy URL via Menus on WooCommerce
Here are instructions for how to link your Return and Refund Policy page URL in the footer of your website by using Menus and Custom Links on WordPress.
- To start, log in to your WordPress website.
- From the Dashboard menu, scroll up to Appearances and choose Menus:
- In the Menus editor, under the Menu structure section, type your Menu Name:
- Next, in the Add menu items section on the left side, click on Custom Links:
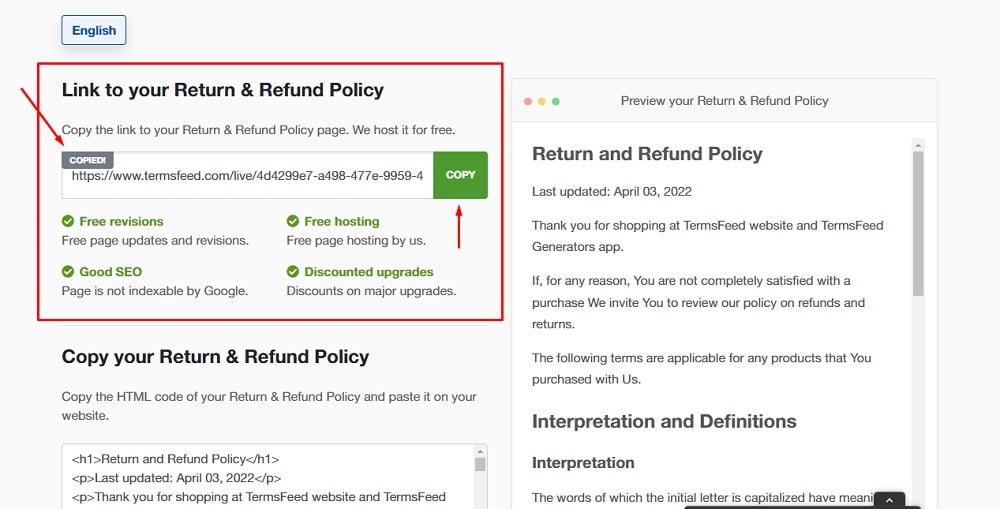
- To get the Return and Refund Policy URL link that's hosted on our site, go to the TermsFeed Generators App and go to the Download page.
-
Under the "Link to your Return & Refund Policy" section, click on the green "Copy" button:
If you do not have a Return and Refund Policy, you can create one right now by using our Return and Refund Policy Generator.
- Go back to the Menus Editor and paste your Return and Refund Policy URL to the URL link field. Type Return and Refund Policy in the URL text field. Click on the Add to menu button:
- Next, check the Footer Menu under Menu Settings, then click Save Menu:


You're done!
Want more?
Check our videos on YouTube channel and learn how to link pages on WooCommerce by using Menus and Custom Product Tabs.
How to Add a Return Policy for WooCommerce via Custom Product Tabs
If you do not have a plugin to add tabs in WooCommerce then you'll need to install one first. To do so, just follow the steps below:
- Go to Plugins > Add New
- Search for Tab
- Install the one for Woocommerce you want
That's it.
Now you can access the Custom Product Tabs that will appear in the Dashboard menu so you can add a Return and Refund Policy to it. Just follow the steps below:
- Go to Custom Product Tabs:
- Click on Add Tab button:
- When the tab editor opens, name the Tab "Return Policy" and change the editor from Visual to Text:
-
Now you can add text to your Return and Refund Policy page.
If you do not have a Return and Refund Policy, you can use our Return and Refund Policy Generator and create it within minutes.
Here's how you can easily just copy and paste text from our generator into your WP website.
- Go to our TermsFeed generators app and log in. In the header menu, choose Agreements & Policies and on your Return and Refund Policy card click the Download button.
- On the download page, scroll to the Copy your Return and Refund Policy section and click on the Copy this to clipboard button:
- Next, go back to the Custom Product Tab editor and paste the text:
- When done, Save Tab you just created:


You've just created your Custom Product Tab with Return and Refund Policy text.
The next step is to add a Return and Refund Policy tab to your Products in WooCommerce. To do so, follow these steps:
- Go to Products:
- When the Products editor opens, chose the Edit option:
- In the Product editor, scroll down to the Product data section and click on Custom Tabs:
- Click on Add a Saved Tab:
- Add the newly saved Tab and click Save Tabs:
- Scroll up to the Publish block and click Update:


You're done!
Now your WooCommerce store will have a Return and Refund Policy accessible to your current and potential future customers.
Not only will this help your business look more professional and transparent, but it will help you maintain control over your return and refund practices. It will also decrease the amount of questions you'll receive about what your return and refund practices and policies are, since people can access your policy swiftly and easily from your store's website.

The first step to compliance: A Privacy Policy.
Stay compliant with our agreements, policies, and consent banners — everything you need, all in one place.


